Virtual stellarium
tags: JavaScript programming celestial coordinates graphical projections coordinates transformation
I’ve been doing astrophotography for many years and at some point realised my pictures deserve more than just a thread on astro-community forum. Most people publish simple picture gallery on their website but I decided to create interactive map of the nigth sky where user could navigate from picture to picture as if he was looking at the sky himself. Following article shows how 19st century unterstanding of the universe helped me to create simple 3D engine in JavaScript.
The goal was to create virtual representation of the sky which anyone could run and could be easily embedded in my website. I used JavaScript programming to develop algorithms, display and navigation (mouse on stationary and touch on mobile devices). I encourage you to review the final gallery here (night sky with additional interface control and picture gallery) but for the sake of this article the core of the stellarium is shown herein:
Fig.1. Interactive map of the nightsky – final result.
3D to 2D projection
Through ages people imagined sky as a sphere surrounding earth's flat surface. Figure 2 shows Flammarion engraving from 1888 which shows a traveller who puts his head under the firmament. While author of this wood angraving is unknown we can tell by the picture that he imagined a firmanent as solid sphere around flat surface of the earth. Nowadays we know his undestanding was incorrect but such model can be used to create virtual illusion of the night sky.

Fig.2. Firmament as a solid sphere on 1888 wood engraving.
Figure 3 below shows geometrical representation of projection I used to map points laying on a sphere surface (3D) onto screen plot area (2D). In order to perform it a line connecting point on a sphere and projection origin (observer) is extended until it hits the plot area (screen). This concept results in simple formula for screen coordinates (xp,yp) based on coordinates of projected point in space (xs,ys,zs+d). Herein projected point is described in cartesian coordinates therefore resulting formula is very simple. It would be shown in next section of this article that final formula transfering celestial coordinate system (which is naturally used to define stars positions) to screen coordinates is much more complex.

Fig.3. Sphere to screen projection.
Initially it seemed to me obvious to put observer in the middle (d=0). Figure 4 below shows result of such projection. It consist of a sphere coordinate grid, celestial equator (blue line) and shape of Orion constellation (orange). Although it works the equator and longitude lines are always straight which, as you navigate through that projection, feels "flat and unnatural".
Fig.4. Projection for d=0.
Alternative approach would be to set d=R such that observer is fixed to side of the sphere opposite to the screen. Figure 5 shows result of such projection. This time equator and longitude lines are bend and you can still zoom in to actually feel like being in the middile of the sphere. Such projection feels natural and was used for the final project.
Fig.5. Projection for d=R?.
Parameter d can be continously adjusted to smoothly transition from one of projections above to another but when we set up d>R observer leaves the insight of the sphere as the traveller from Flammarion engraving (Fig 2.) crossed the firmament to check what is beyond the world he knew. It turns out such projections results in simple 3D graphical engine which plots the wireframe sphere on computer screen and allows to zoom & rotate it as shown below:
Fig.6. Projection for d>R. Simple 3D engine.
Above considerations are only half of the challange. In order to plot full night sky with stars, constellations and my pictures I needed to transition from celestial coordinates to screen coordinates and take into account time, latitude and direction which observer is looking at. The following section shows derivation of final projection formula.
Coordinates transformation
Above considerations are only half of the challange. In order to plot full night sky with stars, constellations and my pictures I needed to transition from celestial coordinates to screen coordinates and take into account time, latitude and direction which observer is looking at. The following section shows derivation of final projection formula.
Celestial coordinate system is a system which specifies positions of satellites, planets, stars, galaxies, and other celestial objects. For the purpose of this project „Equatorial” coordinate system was used. This system is centered at Earth’s center and uses polar coordinates to position objects relative to Earth’s equator as if it was projected out to an infinite distance. Angular coordinates used are Declination (alpha) and Right Ascention (beta). The latter defines angular position around Earth’s rotation axis. One can add time component to this angle in order to model how does night sky changes over time.

Fig.7. Equatorial coordinate system
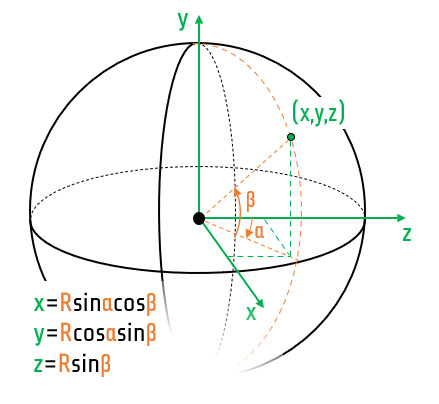
As it was shown in first section of this arcticle formula which projects 3D to 2D coordinates is simple when expressed in cartesian coordinate system. Following picture shows how to transit from Equatorial coordinate system to cartesian coordinate system fixed at the middle of celestial sphere.

Fig.8. Coordinate system transformation (polar to Cartesian)
At particular moment in time position of the stais different for observers on different Lattitudes. In order to take this into account additional coordinate system rotation is made by Lattitude angle rotation around axis x as shown on following figure:

Fig.9. Rotating coordinate system around axis x by Lattitude angle delta?
Once stars position is established we need to be able to navigate through the sky. In order to look around another rotation is made by Azimuth angle around y' axis.

Fig.10. Rotating coordinate system around y' by Azimuth angle
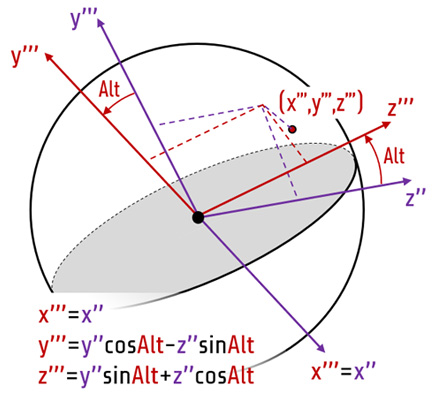
Another angle used to navigate is Altitude angle used look up and down (often refered as Elevation angle):

Fig.11. Rotating coordinate system around x'' by Altitude angle
Once you wrap all these transformations last step is to project resulting coordinates on the screen as it is shown below:

Fig.12. Resulting coordinates projection
Final formula for screen coordinates of projected positions of the stars is as follows:
